![]()
Menu
Reviews
Arduino Zero M0
The Arduino Zero is designed for developers who want to work on a 32-bit platform extension of the original 16-bit Arduino platforms. The Arduino Zero, while it has extended functionality, has some significant limitations that make it not-quite-ready for the average experimenter. While the board has all of the standard I/O pins on the Arduino Uno R3, therein lies one of the drawbacks: you are immediately warned (hopefully) that putting more than 3.3V across the I/O pins could damage the board, this is different than the behavior of other Arduino boards. The Zero is compatible with all shields that are compatible with the Arduino Uno versions, which again, means pay attention to the possible draw and output of your pins when plugging shields into the Arduino Zero.
Additionally, with the Arduino and Genuino AVR controllers, when you upload sketches into the memory you automatically activate the serial reset, which resets the board. When you upload to the Zero, the AVR serial is not triggered, so you have to manually reset it with the Reset button on the board. This has got to be one of the most difficult features to get used to, especially since I have previously used the other Arduino boards and I've grown accustomed to the annoying (but eventually useful) AVR serial restarts when I upload new code.
Keeping in mind, the Zero can pull up to 800 mAh, but you want to be cautious about pushing the envelope on this board. The multiple warnings included with it make me want to avoid using it for anything other than developer applications, while relying on the original designs more for functionality and real-life applications. In some ways, I'm sure that's hot it is designed, but getting used to the 48 Mhz processing makes it real step down to a third of that speed when working in the real world. Also, note that Zero does try to protect itself, so that if voltage over the 500 mAh is applied across the USB, the board's built-in fuse engages and shuts it down.
The M0 version of the Zero makes it possible to use the debug chip to run debug feed out of the micro SD port on the board.
The documentation of the debug functionality is sketchy at best, but if you are willing to play with it, it starts to make
some sense. Compared to other Arduino boards, the setup is a bit tricky. It has a USB programming port and a USB serial port.
The serial debug port and the programming port are shared on other Arduinos, but this board has the ability to debug with
Atmel studio, so the programming port seems to not be able to be used as a Serial debug port for debugging the SAMD21 chip.
In the end, be ready with two USB Micro B cables for this board -- one for programming and one for serial debugging.
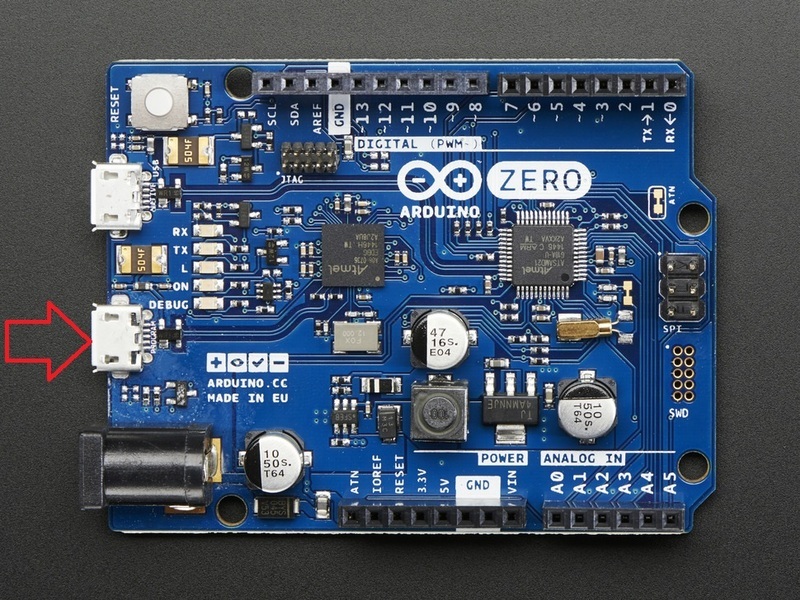 The built-in debug port is probably the most remarkable and useful feature for developers in the Arduino Zero M0. |
|---|
Also be warned that the Arduino IDE doesn't flash to this board, so the .org IDE and the .cc IDE are not compatible.
The Good and the Bad
Although this is an impressive variant on the Arduino, I would advise not purchasing the Arduino Zero until it matures. Its features and behavior are counter-intuitive to other Arduino products (which makes it not ideal for practiced Arduino enthusiasts) and its setup is more complex than other Arduinos (which makes it not ideal for new Arduino experimenters). Its incompatibility is makes it limited for the new user, while the higher-end functions used by developers need more maturing and documentation.
Return to Top
Arduino Capacitance Touch Shield
There are a number of shields available for the Raspberry Pi, Arduino and other microcontroller type devices. Shields are circuit boards with matching pin-sets so that they ride on top of the exposed microcontroller circuit board and allow connection to the pin sets.
Touch Switch
A touch switch operates on the natural capacitance of the human body. One example, the well-known 555 Touch Sensor Switch uses the static charge from a person's touch to activate enough of a voltage across the trigger pin on a 555 timer chip. The specifics of building one from a 555 timer chip can be found in multiple places, such as here. The same principle is utilized in the MPR121 Adafruit Capacitance Touch Shield. Relatively cheap and easy to order, the MPR121 requires a little setup in order to get working properly. First, the board comes without pins, which means they have to be installed (soldered) manually. While you can only solder connections to specific pin points, but for general use purposes, pins can be connected to all of the socket holes on the shield.
Arduino Capacitance Touch Shield
The Arduino Capacitance Touch Shield works on the process of the touch switch, however, the connections (twelve of them) are wired into a single output through binary response. The code normally utilized is an Arduino library file MPR121.h The MPR121 has twelve touch connections. By connecting an alligator clip between the two holes and connecting the other end to a device such as a piece of metal, a piece of fruit, or anything else that can hold a capacitance charge, you can trigger the connections.
#include
#include "Adafruit_MPR121.h"
#include "pitches.h"
Adafruit_MPR121 cap = Adafruit_MPR121();
uint16_t lasttouched = 0;
uint16_t currtouched = 0;
int BUZZER_PIN = 8;
int notes[]={NOTE_C4,NOTE_D4,NOTE_E4,NOTE_F4,
NOTE_G4,NOTE_A4,NOTE_B4,NOTE_C5};
void setup() {
while (!Serial);
Serial.begin(9600);
Serial.println("Adafruit MPR121 Capacitive Touch sensor test");
if (!cap.begin(0x5A)) {
Serial.println("MPR121 not found, check wiring?");
while (1);
}
Serial.println("MPR121 found!");
}
void loop() {
// Get the currently touched pads
currtouched = cap.touched();
pinMode(BUZZER_PIN, OUTPUT);
for (uint8_t i=0; i<12; i++) {
if ((currtouched & _BV(i)) && !(lasttouched & _BV(i)) ) {
Serial.print(i); Serial.println(" touched");
}
if (!(currtouched & _BV(i)) && (lasttouched & _BV(i)) ) {
Serial.print(i); Serial.println(" released");
}
if ((currtouched & _BV(i))) {
tone(BUZZER_PIN, notes[i]);
}
if (!(currtouched & _BV(i)) && (lasttouched & _BV(i)) ) {
tone(BUZZER_PIN, notes[i], 50);
}
}
lasttouched = currtouched;
return;
delay(50);
}
The Good and the Bad
The Capacitance Touch Shield is very similiar to the nine-button keypads that are available for a little cheaper. The difference between them (although the driving code is similar) is that the touch shield can be connected to a variety of devices for touch level activation. After purchasing several boards, they have proved pretty reliable and are pretty durable when it comes to soldering pins to the shield. While the MPR121 doesn't always act completely reliably with some off-brands of Arduino (such as the SainSmart Arduino, or the odd brands of the Arduino such as the Leonardo or the Mega AT) will require some tweaking, but the MPR121 library is pretty effective across the board. For a fun, simple project that requires minimal hard electronics work but has some impressive scientific wow effect, this is a cheap, easy product.
MPR121 Capacitance Touch Shield with Pins |
|---|
Return to Top
Shopping Engines
Search Retailers |
|---|
| Amazon |
| eBay |
| Electronic Goldmine |
| SainSmart |
| Velleman Store |
| Adafruit |
| Newegg |
| Jameson Electronics |
| Surplus Electronics |
| All Electronics |